Description
D&R Axum Remote Control Software
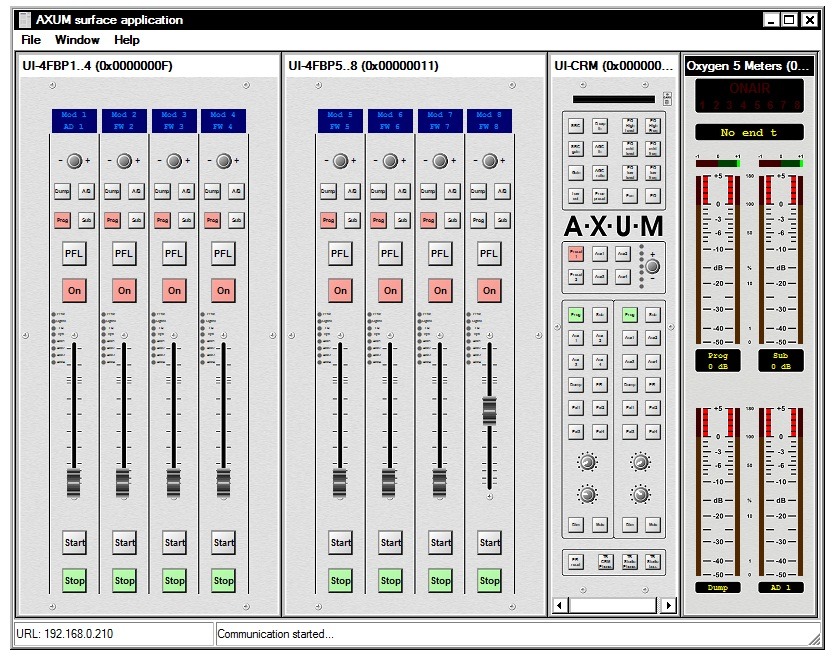
The AXUM Remote software application is designed as a software remote control for the hardware users interface such as the fader panels and CRM section. The idea is that when no one is in the Studio or as a remote help, there is still the ability to control the AXUM system parts from any place in the world.It is also possible to create an extra mixing console in the studio without having to invest in the control surface hardware. Just add an extra CRM card in the rack and the physical outputs are there. All existing inputs in the Rack can be used by this virtual mixing consoles as well.
You can log on to the system by entering the IP address of the AXUM and get real time control over all the
hardware functions that are on the control surfaces and in the CRM section of all consoles in use in the studio.
I am sure it will save a lot of travelling and… peace of mind.
For (remote) configuration the web browser is used to access the consoles web server. Of course this happens on an IP-based level of communication, which makes it possible to configure your system over the internet.
** this software can only to be used with your hardware AXUM-IP digital studio platform **
Any switch can be activated in real time by clicking on the switch, the colour will indicate that the function has been activated. Faders can be repositioned by simply bringing the mouse to the faderknob, click the left mouse button and move the fader to its new position. The fader in the Studio will move accordingly, so local visual control is always there.If someone fades down again it will be seen on the screen of the PC.
In order to control the Encoder on top of the module, click once or repeatedly on the + or – signs right and left of the Encoder knob.
Virtual modules

Any switch can be activated in real time by clicking on the switch, the colour will indicate that the function has been activated. Faders can be repositioned by simply bringing the mouse to the faderknob, click the left mouse button and move the fader to its new position. The fader in the Studio will move accordingly, so local visual control is always there. If someone fades down again it will be seen on the screen of the PC.In order to control the Encoder on top of the module, click once or repeatedly on the + or – signs right and left of the Encoder knob.
Also all the functions in the CRM section work exactly as the real thing in the studio.The only difference is the control of the 4 level pots in the CRM section, click on the knob and move it with left mouse button held down to its desired position.Likely there is no need to control the CRM speakers or phones in the studio that often. When clicking on or near the Chipcard connector location, a popup menu will appear that asks for your username and password if you want to go further inside the system.
Virtual modules processing channel
In this overview you actually see all functions of one processing channel. The top of the module shows the LCD with 4 switches on the right side with the following functions:
1. Module selection up
2. Module selection down
3. Source select up
4. Source select down
Then there is Phantom, Pad and Gain. Below that there is a row of switches where you can load presets. Left of the DSP gain you can control Phase on/off and MONO on/off.
Below that you can control Insert on/off,Then the Low Cut switch and the cutoff frequency can be set between 40Hz and 180Hz.
The EQ can be switched on or off and all frequency responses can be set graphically. A magnifier in the lower right hand corner will pop up a larger graphical display with instant control over all equalizer functions.
Then there is the Voice processing section where all three parameters can be adjusted.The Pan Pot can be adjusted from left to right.
The switch above the fader is to switch between a 4 band and 6 band EQ. (PFL is of no use when remote controlling a desk).Here the fader can be controlled.
The right hand section contains the Channel meters and Phase meter.Below the meters you see all 32 busses that can be assigned.
Every buss has a pan and Level control and 2 switches of which the function is programmed in the AXUM already. These functions can then be switched on or off remotely.

Control communication
All control communication takes place with MambaNet and gives the surface flexibility and power to the AXUM digital studio platform.
To understand the AXUM digital studio platform, it would help to know some principles of MambaNet.
MambaNet definitions:
– Objects: A fader, switch will have to trigger an action in the AXUM digital studio platform.
In MambaNet, we call these faders and switches “objects”.
– Nodes: In the hardware the faders and switches are grouped on modular blocks.
Such blocks are represented as “nodes” in MambaNet.
– Engine: In the AXUM digital studio platform the engine is in fact your mixing console.
The functions available in the “engine” can connect to one or more objects found in your network.
In practice this means that you can connect any surface element like switches and faders to any function of your mixing console(s). From now on, you can design your own functionality at the control surface.
Features:
- Remote configuration via HTTP and TCP/IP
- Remote control via MambaNet over UDP/IP and TCP/IP
- Create your extra mixing console without extra hardware
- All inputs can be used by this virtual mixing console
- Advanced security system based
- IP-based communication
- Standardized cabling with RJ45 (shielded for audio connections)
- Print your labels of the modules to possibly change them inside the hardware switches if needed.
- Real time control
- User database for identification
- Description
-
D&R Axum Remote Control Software
The AXUM Remote software application is designed as a software remote control for the hardware users interface such as the fader panels and CRM section. The idea is that when no one is in the Studio or as a remote help, there is still the ability to control the AXUM system parts from any place in the world.It is also possible to create an extra mixing console in the studio without having to invest in the control surface hardware. Just add an extra CRM card in the rack and the physical outputs are there. All existing inputs in the Rack can be used by this virtual mixing consoles as well.
You can log on to the system by entering the IP address of the AXUM and get real time control over all the
hardware functions that are on the control surfaces and in the CRM section of all consoles in use in the studio.
I am sure it will save a lot of travelling and… peace of mind.
For (remote) configuration the web browser is used to access the consoles web server. Of course this happens on an IP-based level of communication, which makes it possible to configure your system over the internet.** this software can only to be used with your hardware AXUM-IP digital studio platform **
Virtual modulesAny switch can be activated in real time by clicking on the switch, the colour will indicate that the function has been activated. Faders can be repositioned by simply bringing the mouse to the faderknob, click the left mouse button and move the fader to its new position. The fader in the Studio will move accordingly, so local visual control is always there.If someone fades down again it will be seen on the screen of the PC.
In order to control the Encoder on top of the module, click once or repeatedly on the + or – signs right and left of the Encoder knob.Virtual modules

Any switch can be activated in real time by clicking on the switch, the colour will indicate that the function has been activated. Faders can be repositioned by simply bringing the mouse to the faderknob, click the left mouse button and move the fader to its new position. The fader in the Studio will move accordingly, so local visual control is always there. If someone fades down again it will be seen on the screen of the PC.In order to control the Encoder on top of the module, click once or repeatedly on the + or – signs right and left of the Encoder knob.
Also all the functions in the CRM section work exactly as the real thing in the studio.The only difference is the control of the 4 level pots in the CRM section, click on the knob and move it with left mouse button held down to its desired position.Likely there is no need to control the CRM speakers or phones in the studio that often. When clicking on or near the Chipcard connector location, a popup menu will appear that asks for your username and password if you want to go further inside the system.
Virtual modules processing channel
In this overview you actually see all functions of one processing channel. The top of the module shows the LCD with 4 switches on the right side with the following functions:
1. Module selection up
2. Module selection down
3. Source select up
4. Source select downThen there is Phantom, Pad and Gain. Below that there is a row of switches where you can load presets. Left of the DSP gain you can control Phase on/off and MONO on/off.
Below that you can control Insert on/off,Then the Low Cut switch and the cutoff frequency can be set between 40Hz and 180Hz.
The EQ can be switched on or off and all frequency responses can be set graphically. A magnifier in the lower right hand corner will pop up a larger graphical display with instant control over all equalizer functions.Then there is the Voice processing section where all three parameters can be adjusted.The Pan Pot can be adjusted from left to right.
The switch above the fader is to switch between a 4 band and 6 band EQ. (PFL is of no use when remote controlling a desk).Here the fader can be controlled.
The right hand section contains the Channel meters and Phase meter.Below the meters you see all 32 busses that can be assigned.
Every buss has a pan and Level control and 2 switches of which the function is programmed in the AXUM already. These functions can then be switched on or off remotely.
Control communication
All control communication takes place with MambaNet and gives the surface flexibility and power to the AXUM digital studio platform.
To understand the AXUM digital studio platform, it would help to know some principles of MambaNet. MambaNet definitions:
– Objects: A fader, switch will have to trigger an action in the AXUM digital studio platform.
In MambaNet, we call these faders and switches “objects”.
– Nodes: In the hardware the faders and switches are grouped on modular blocks.
Such blocks are represented as “nodes” in MambaNet.
– Engine: In the AXUM digital studio platform the engine is in fact your mixing console.
The functions available in the “engine” can connect to one or more objects found in your network.
In practice this means that you can connect any surface element like switches and faders to any function of your mixing console(s). From now on, you can design your own functionality at the control surface.
Features:
- Remote configuration via HTTP and TCP/IP
- Remote control via MambaNet over UDP/IP and TCP/IP
- Create your extra mixing console without extra hardware
- All inputs can be used by this virtual mixing console
- Advanced security system based
- IP-based communication
- Standardized cabling with RJ45 (shielded for audio connections)
- Print your labels of the modules to possibly change them inside the hardware switches if needed.
- Real time control
- User database for identification

